Dynamic Groups
In Temeda platform v2.68 we’ve added a new feature called Dynamic Groups. The existing Groups feature – used for creating collections of assets – has been part of the Temeda platform since the beginning. Dynamic Groups leverage the power of standard groups and at the same time make maintaining your groups much simpler.
There are 2 main reasons for using Groups:
- Groups allow you to create logical collections of similar Assets in order to simplify things, such as finding Assets on the Map, running Reports, setting up Alerts, or creating Maintenance Plans. Some examples of logical Groups are “Trucks”, “Vans”, “Excavators”, or “Dozers”.
- Groups also provide a layer of security or limited visibility for non-Administrator Users. Regular Users have visibility ONLY to the Assets within the Groups or Projects that have been assigned to that User. A Group that is used for security purposes will typically contain a mix of various Assets. Some examples of Groups used for security are “Sales Team”, “Service Department”, or “Division 1”.
What is a Dynamic Group?
Dynamic Groups are simply Groups – but instead of selecting Assets from a list, you choose a series of asset property filters and/or hierarchy levels to dynamically generate the group. The asset property filters are essentially any field from the asset detail page. A few examples of asset property filter fields are Asset Name, Description, Year, Make, Model, Equipment Type, and Equipment ID. You can also select any number of levels from within your organizational account hierarchy as a Dynamic Group filter.
How to create a Dynamic Group
Creating a Dynamic Group requires 3 steps:
- Select one or more asset property filters and/or hierarchy levels
- Choose a conditional operator
- Enter your filter criteria
When creating a Dynamic Group, you start by dragging and dropping an asset property field. Then choose a conditional operator such as “Equals”, “Not Equals”, “Contains”, “Does not Contain”, “Less Than”, or “Greater Than”. Finally, enter your filter criteria for the selected field. You can then preview the assets generated by your filter(s) and then click the Save button. There is no limit to the number of fields you choose to filter by.
Examples of Dynamic Groups
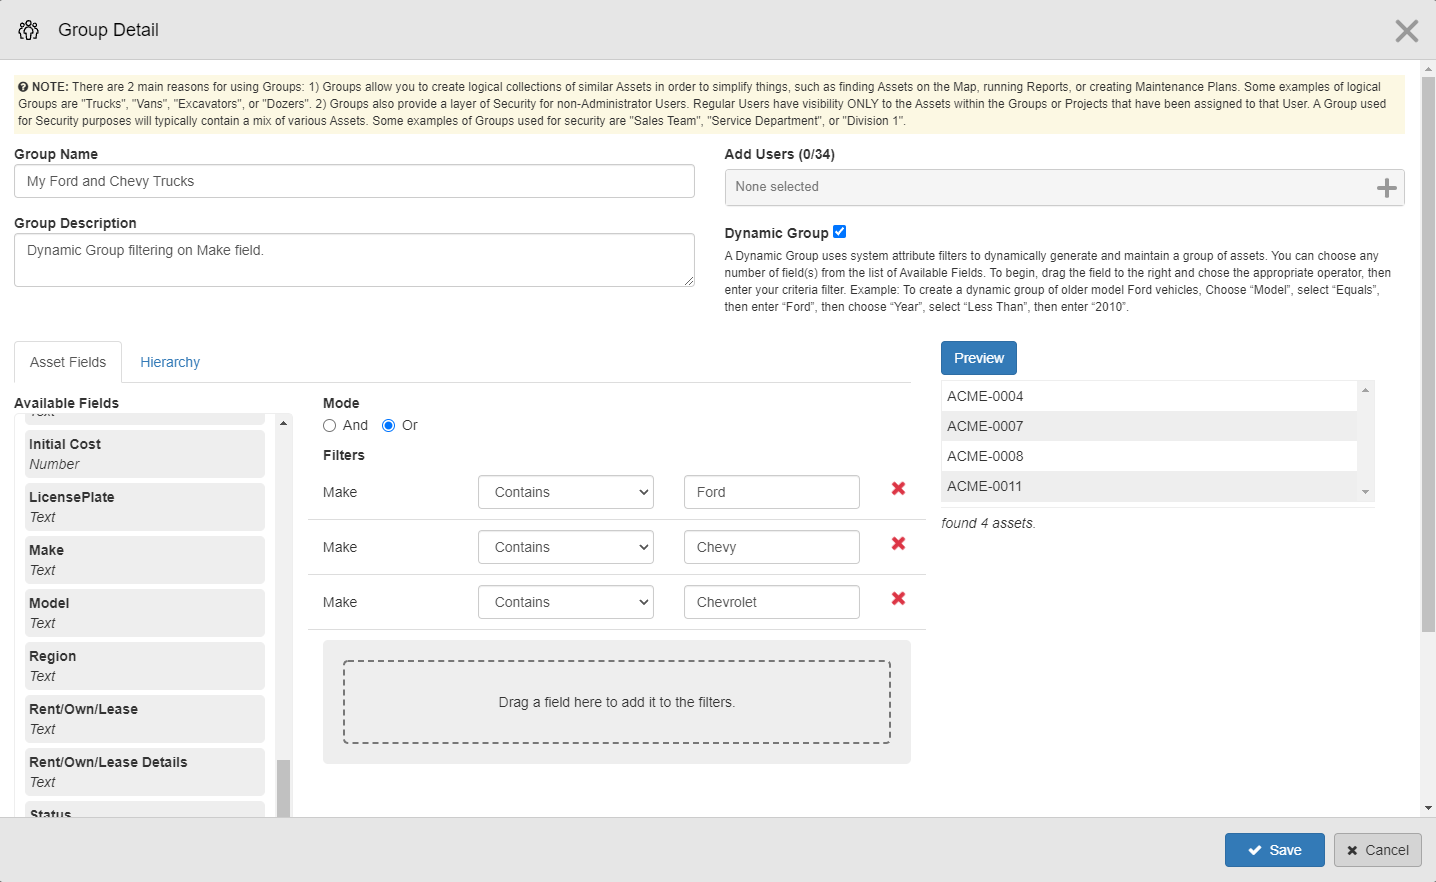
Example 1: Create a dynamic group of older model Ford vehicles: Drag and drop the “Model” field, select operator “Equals”, then type “Ford” for the criteria. Add another filter by dragging and dropping “Year”, select operator “Less Than”, then enter “2010”. Click the Preview button to see the generated list of assets. If everything looks good, enter a name for your new group and click Save to complete the process.
Example 2: Create a dynamic group of cement equipment in the Midwest region: Choose “Equipment Type”, select operator “Equals”, then type “Cement” for the criteria. Add another filter by clicking the Hierarchy tab and select the “Midwest” checkbox. Click the Preview button to see the generated list of assets. If everything looks good, enter a name for your new group and click Save to complete the process.
Benefits of Dynamic Groups
Dynamic Groups makes it easier to create and maintain groups especially for fleet managers with many assets and equipment types. An added benefit of Dynamic Groups is that as your organization changes, and equipment is acquired, moved to different divisions, or assets are modified – the Dynamic Groups system will automatically stay up-to-date with your changing fleet. This means that as data changes throughout your account, the rules that you specify for a Dynamic Group will be aware of changes made to assets and hierarchies, and the system will synch up your groups by dynamically adding assets that match the updated criteria and/or remove assets that do not.
Also, a Dynamic Group is still just a group – so that means you can use Dynamic Groups for running reports, creating alerts, creating maintenance plans, assigning user asset visibility, filtering dashboards, and filtering the map.
The Dynamic Groups feature will help fleet managers create more precise and targeted groups of assets using rules based upon asset properties and hierarchy levels. Dynamic Groups will also keep your system current, and administrators will not have to worry about constantly maintaining assets within your groups as your organization changes over time.
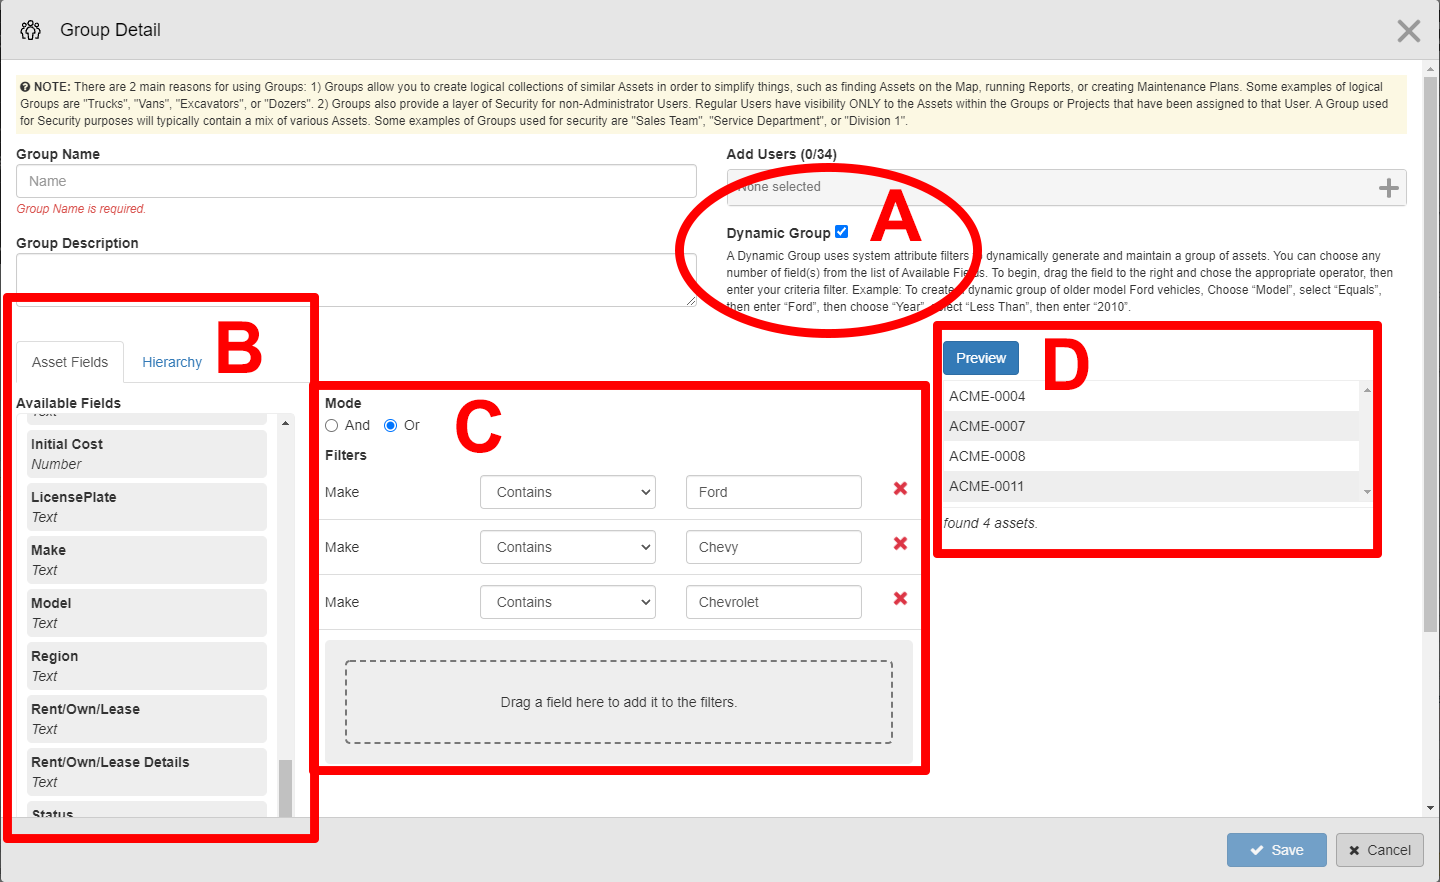
Dynamic Groups admin page.
Steps to create a Dynamic Group
There are 4 new areas within the Groups add/edit page that will allow administrators the ability to create or edit Dynamic Groups:
- Dynamic Groups checkbox: Select this box to create a dynamic group vs. a normal (static) group.
- Filter Fields: Select one or more fields and/or a hierarchy level
- Mode and Filters:
- Choose a mode – “And” or “Or”. When selecting “And” mode, only those assets that match all of the filter criteria rules will be included in the group. When selecting “Or” mode, only those assets that match any of the filter criteria rules will be included in the group.
- Select one or more Filter fields, an Operator, and filter Criteria. Start by dragging and dropping a field from the left onto the drop area. Then, depending on the field type, choose an Operator. Operators can be one of the following: Equals, Not Equals, Contains, Does not Contain, Less Than, or Greater Than. Then enter your Criteria by typing in a value.
- Hierarchy: If your organization has configured assets using our hierarchy feature, you can also click the Hierarchy tab and select one or more divisions – in combination with the field filters – to further filter the assets within the dynamic group. The Hierarchy tab can also be used as a standalone filter for the assets in the group without and field filters.
- Preview: Click the Preview button to display a list of assets generated by the query you have created using the field filters and/or hierarchy filters.
Dynamic Groups require a name, and you can optionally add any Users for security purposes. Finally, if the correct assets for your new group are appearing in the preview pane, then finish your work by clicking the Save button.